What are Quality Measurements for?
Quality Measurements are for measuring the quality of MT translations against Human Translations. Though these measurements are not and can never be 100% accurate, they are a good measure of how the MT output compares to the human translated output.
These measurements can help pinpoint where your engine needs improvement by showing where terminology or terms might be missing and if more language model is needed.
When engines have matured with more increments of data added to the engine over time, then you can expect to see metrics such as BLEU scores get higher and higher.
What quality metrics do we use?
There are four metrics Language studio uses - BLEU, F-Measure, TER Metric and Levenschtein Distance.
Full details about how each metric is measured is out of scope for this guide, though details can be found online.
How do we create a measurement metric?
We create a measurement by comparing a human translated file of a source file against an MT output from the same source file.
Both files must be of same length and the human translated files must not have extra content added to the translation, otherwise any metrics run will never produce an accurate score. For example, adding meanings in brackets or adding other content that is not mentioned in the source, will corrupt the metrics score.
To get close to a fair metric we recommend using files with no fewer than 1000 sentence segments.
How to run a measurement through Language Studio
To use this metrics tool, you will need the following:
- The original source file used for the metric.
- A reference file (this is the human translated file).
- Language Studio candidate files that were previously translated against the source file, these are the Historical Translations, for example MT output from the version before the current version of the engine.
- (Optional) It is also possible to use other candidates, such as Google, Bing or other MT comparisons and previous versions of the MT engine
There are two options for running a quality metric, either run a metric with candidate files only (User Provided Files tab) or run a metric against a live engine which creates a Language Studio candidate from translating the source file on the engine (My Custom Engines tab). We will look at both options below.
File Naming Conventions
For Historical Translations candidates (files translated through Language Studio)
<filename>.<languagepair>-LS-DC<#>.V<#>-DATE<yyyymmddhhmm>.txt
For example:
TestFile.EN.ES-LS-DC1301965.V01-DATE201608101245.txt
Please note: Do not use a dash (–) between the source and target in the file name, use a period (.) e.g. EN.ES.
For other MT Providers, use this naming convention.
<filename>.<languagepair>-Provider-DATE<yyyymmddhhmm>.txt
For example,
Test.EN.ES-Google-201608101245.txt
Submitting a quality measurement through your Custom Engine
To start, select Menu>Tools>Measurements.
Running a Metric Options
You have two choices to run a metric here, run off a translation for the metric, by clicking the Translate Source With My Custom Engine with the option to add the metrics score automatically to the engine as a Note. There is also the choice of which Version of the engine you want to translate with by using the drop down menu to change versions. Please see the option, Run a Metric With Test Set.
Alternatively, the metric can run without using the engine for translation and you can just run Historical Language Studio candidates instead (this option is available if you wish to translate as well). Details on how to do this is User Provided Files Metric below.
Running a Metric through the Engine
Source and Reference Page
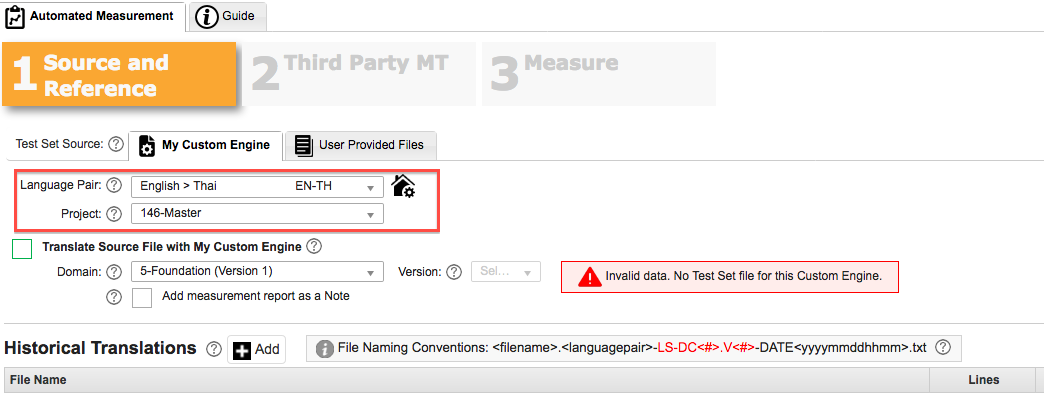
In the My Custom Engine tab, select the Language Pair and relevant project.

Choose the engine you wish to use for the metric.

Upload your Source file by clicking Add.
In the Add File – Source screen, click Add Files (or select the source file from the Project folder). Then select the engine you wish to translate with under Domain.

On some engines, you may notice a warning sign that there is no test set for the custom engine. To set this up you need to load up a test set for the engine.
To access the engine, click on Menu>Custom Engine>Custom Engine Catalog.

Under My Custom Engines tab click Advanced and Expand All to see all the engines in your account.

Select the engine you wish to run a metric on, by selecting the green arrow next to the engine.

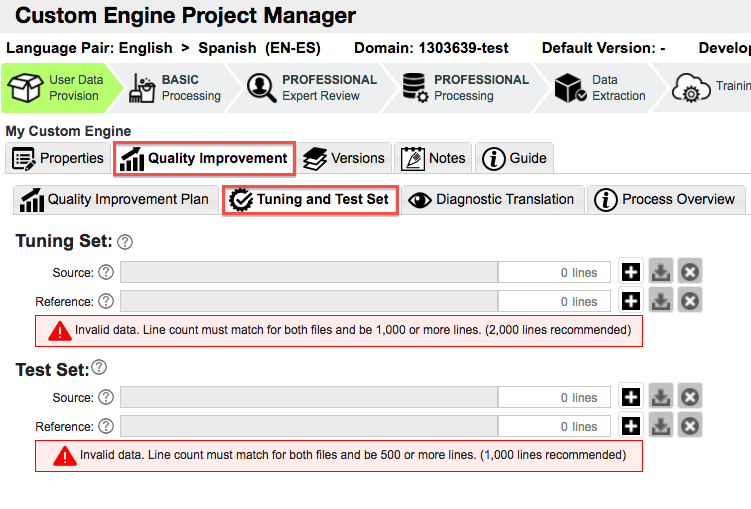
In the Custom Engine Project Manager screen select My Custom Engine>Quality Improvement>Tuning and Test Set

Click the Plus sign to upload your test set and you will see the files now appear. For this purpose, you are focusing on the test set, not a tuning set.

When you go back to the Automated Quality Measurements screen, the warning message that No Test Data is available will have disappeared.
Now you can click Next (please scroll down to Third Party MT) to add a Third Party MT candidate.
If you have no test set ready or just wish not to upload the test set to the engine. An Alternative is to run through the User Provided Files option.
Run a Metric With Provided Files
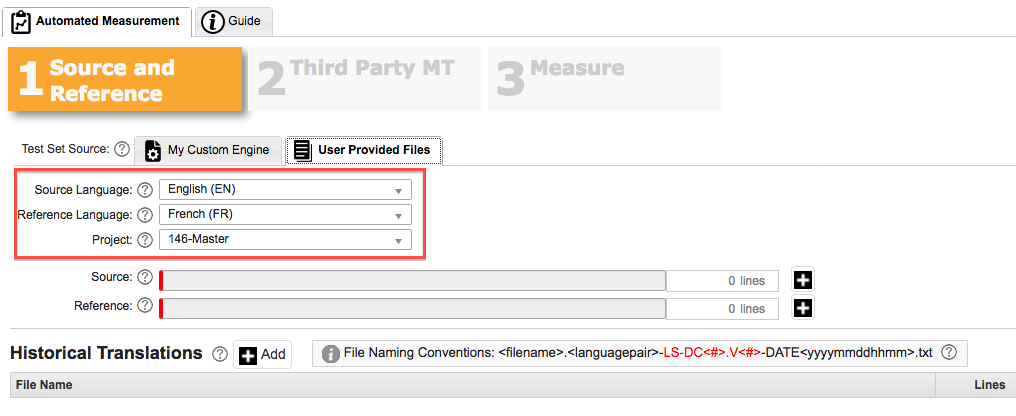
To start, select the relevant Source and Reference Language pair and project folder you will be using. Upload your Source file by clicking the plus sign.

Upload your Source file by clicking the plus sign.

In the Add File – Source screen, click Add Files (or select the source file from the Project folder - this is where previous files have been kept).

Once the file has uploaded, select Save.

Now, select your Reference file by clicking the plus sign (this is the human translated file for the quality measurement).

Same as with the source file, either upload or select a file from the project folder. When done, click Save.

The tab will now show the Source and Reference files have been uploaded.


Uploading Historical Translations
If there are some existing Language Studio Candidates that you wish to run the measurement with, click +Add. You can either upload a file (tab – Upload Files to Project) or select the Select Files From Project tab. Remember to use the correct naming convention.
Once you have selected the files, click Save to upload the file/s and the files will be displayed.
Now that you have the files ready, click Next.

Uploading and Submitting Third Party MT
This page gives you the option to do the following:
- Send the source file to Google and/or Bing for translation (so you can compare Language Studio translation with Google and Bing)
- Upload other candidates (existing Google and Bing Translations or other MT output comparisons)
Translate with Third Party MT
If you have a Google or Bing Key, enter your credentials here to send the source file out to Google or Bing for a translation. How to obtain a Google or Bing key is not in scope for this guide.

To select previous third party translations from the Historical Translations segment, press Add and select the appropriate files. Please note the naming convention for the files:
<filename>.<languagepair>-Provider-DATE<yyyymmddhhmm>.txt
For example,
Test.EN.ES-Google-201608101245.txt
Remembering to not put a dash between the source and target in the language pair.
Once finished, click Next, to get to the final tab to submit the measurement.
Measure Tab
This page details what will be in the report and how it is measured.
Enter the Title that you wish the Measurement report to be called.
Add an email address to the Email field for where the measurement report will be delivered to.
Basic Report tab
If you want the measurements to be case sensitive or not, please check where appropriate.
Files
This gives you an overview of which files are being run through the Quality Measurement tool. Notice the Provider column will details what type of file it is. If the field is blank, check the naming of the file has been done correctly.
Press the Back button if these files are incorrect or you wish to upload other candidates.
Additional Report Sections tab
Click Change Tracking, if you want the report to detail where the difference is for each segment in the metric comparison. For example:

You also have the option to use the tracking for All Candidates, just Language Studio Candidates or you can Select the Candidates you wish.
When finished, click Submit Job and the files will be sent for evaluation.
A confirmation will appear telling you that the job has been submitted successfully.
You can check the evaluation by going to the Job Queue (click on Menu>General>Job History).
Once the job is showing its status as Complete, select the appropriate job and click Download.
The measurement will appear in PDF format and lists an overview of the Metrics scores as well as each sentence broken down into individual BLEU, F-Measure, TER and Levenschtein Distance measurements. This report will also be sent to you by email (which was listed in the Measure tab).
